
Fax
Q. Can I register the frequently used fax numbers?
A. Yes. You can register the frequently used fax numbers in the address book.
You can also put a number of one-touch destinations in one group and register them as a group.
Once you have registered a one-touch or group destination, you can recall it by simply tapping the assigned key.
For details on how to register a one-touch destination, refer to Here.
For details on how to register a group destination, refer to Here.

You can register up to 2000 one-touch destinations in the address book.
You can register up to 100 group destinations in the address book.
To register a group destination, members must have been registered as one-touch destinations.
Q. Can I sort Favorite in the registration name order on the scan/fax screen?
A. Select [Utility] - [Utility] - [Customize] - [Option] - [Scan/Fax Settings], then set [Default Address Sort Method] to [Name Order] (default: [Number Order]).
This setting is only applied to the classic-style screens.
Q. Can I collectively send data to multiple destinations?
A. Yes, you can.
It eases the operation to register a group that contains a number of destinations beforehand.
The maximum number of destinations that you can specify for a single transmission depends on how the destinations are set.
Item | Specifications | |
|---|---|---|
When using the address book | 500 addresses Up to 30 User Boxes | |
When directly entering addresses | 5 addresses | |
User Box | 1 User Box | |
Fax | 100 addresses | |
To specify multiple destinations, select [Restrict User Access], and set [Multiple Addresses Restriction Setting] (Here) to OFF.
To specify the entire group in Group, select [Restrict User Access], and set [Select All Groups] (Here) to ON.
When registering a group, even destinations of different types can be registered in one group.
Q. Can I collectively send data to multiple destinations?
Operation procedure: Selecting multiple addresses from the address book
Load the original.
Tap [Fax] on the home screen.
Specify the destination.
You can select more than one one-touch destination from the address book. When you tap the destination display area, the destination list screen is displayed. You can check or delete the specified destinations.
Select an index to narrow down destinations to display.
You can also select a group.
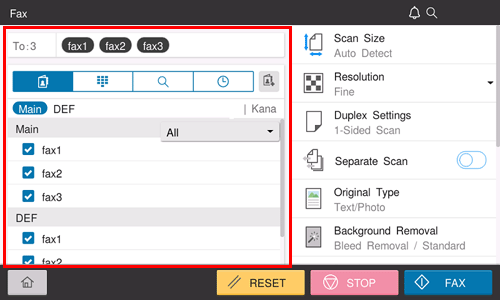
Use the Start key to start transmission.
Operation procedure: Directly entering multiple destinations
Load the original.
Tap [Fax] on the home screen.
Tap the [Direct Input] tab (
 ).
).The fax number entry screen is displayed.
Enter the fax number of the destination, and tap [].
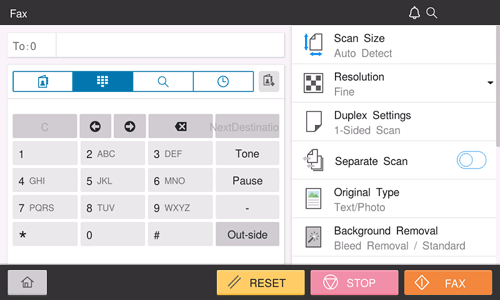
Repeat Steps 3 and 4 to complete entry of all destinations.
The number of entered destinations is displayed in the destination display area.
Use the Start key to start transmission.
Q. Can I forward a received fax?
A. Yes, you can forward a received fax to another fax machine, a computer or an E-mail address by registering forwarding destinations beforehand. For details on the setting procedure, refer to Here.
Q. Can I select a PC-Fax recipient from the Address Book stored on this machine?
A. You can select a PC-Fax destination from the list of one-touch destinations on the machine by acquiring information on the address book on the machine when specifying a PC-Fax destination using the fax driver.
You can use the PC-Fax transmission only when this machine can communicate with the PC through the network.
Q. Can I select a PC-Fax recipient from the Address Book stored on this machine?
Operation procedure
You can use the PC-Fax transmission only when this machine can communicate with the PC through the network.
From the [FAX Transmission Popup] screen, select [Add from Address Book...].
Select [Address Book List] from the list at the left of screen, and display the desired recipient in the [Address Book] list.
Click the [Get Addr. Info] button, and this machine starts communication and obtains the recipient information.
When you click [Search...], you can use a conditional search. The search results are displayed in the [Address Book] list.
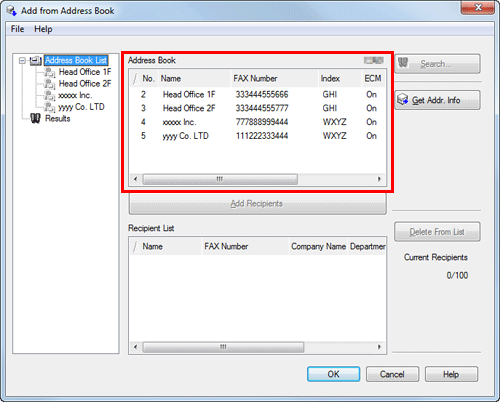
Select the recipient from the [Address Book] list, then click [Add Recipients].
You can register up to 100 recipients.
To cancel a recipient, select it, then click [Delete From List].
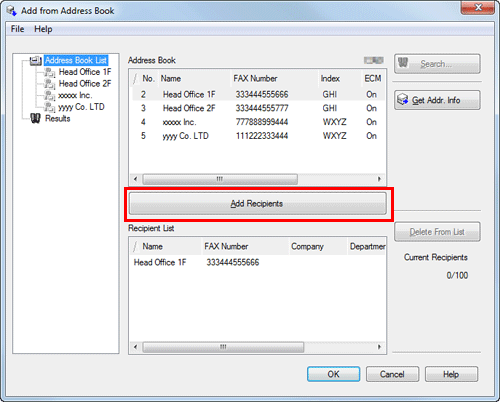
Click [OK].
The screen returns to the [FAX Transmission Popup] screen.
Q. Can I register multiple sender names displayed on the fax to use them depending on purposes?
A. Yes, you can register multiple sender names and select one when sending a fax.
For details on the setting procedure, refer to Here.
Q. Can I select a fax destination from the history?
A. Yes. In Job History ( ), you can select a fax destination from the history to send a fax.
The latest jobs (up to five) are displayed for history purposes.
If the main power is turned off and on, history information is deleted.
Q. Can I select a fax destination from the history?
Operation method
Load the original.
Tap [Fax] on the home screen.
Select the Job History tab (
).Specify the destination.
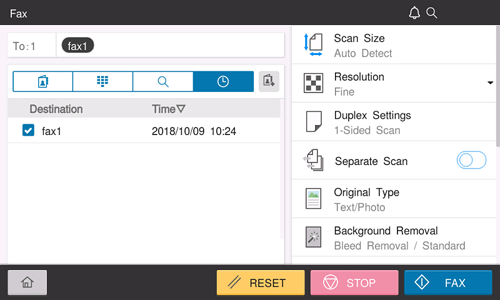
Use the Start key to start transmission.
Q. How can I perform a search using the registration number of a fax one-touch destination?
A. Open the Scan/Fax screen of classic style, then tap [Direct Input] - [Fax]. Then, enter the registration number of the target one-touch destination in the [Reg. No.] field on the fax number entry screen, enabling you to perform a search. For details, refer to Here.
Q. Can I directly fax a file on a computer without leaving my desk?
A. Yes. You can fax a file in the same manner as you print out a file created on your computer.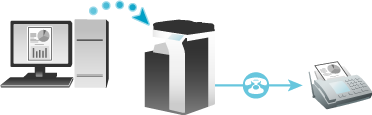
The following preparatory steps are required:
Installing the fax driver to the computer
Connecting this machine to the network
Q. Can I directly fax a file on a computer without leaving my desk?
Operation method
Open the file in the application, and click [File]. Then click [Print] from the menu.
Select a fax driver from [Select Printer] (or [Printer Name]) then click [Print] (or [OK]).
Enter the name and the fax number of the destination, then click [Add Recipients].
You can also specify the destination by clicking [Add from Address Book] and selecting one from registered one-touch destinations.
To specify more than one destination, repeat step 3.
To delete a destination you have specified, select the destination to delete from [Recipient List] and click [Delete From List].
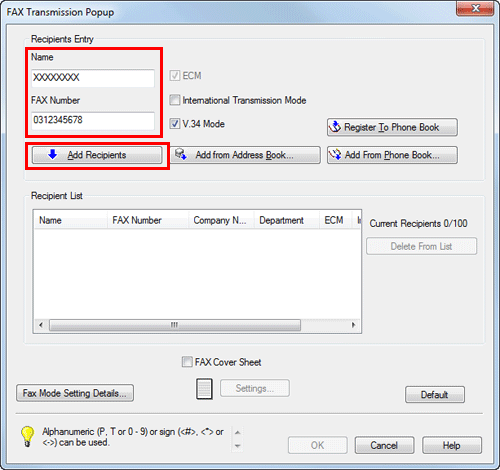
Click [OK] to start fax transmission.
Q. Can I register the frequently used network fax numbers?
A. Yes. You can register frequently used destinations in the address book.
You can also put a number of one-touch destinations in one group and register them as a group.
Once you have registered a one-touch or group destination, you can recall it by simply tapping the assigned key.
For details on how to register a one-touch destination (Internet fax destination), refer to Here.
For details on how to register a one-touch destination (IP address fax destination), refer to Here.
For details on how to register a group destination, refer to Here.
To use the Internet Fax and IP Address Fax functions, ask your service representative to configure settings. For details, contact your service representative.
You can register up to 2000 one-touch destinations in the address book.
You can register up to 100 group destinations in the address book.
To register a group destination, members must have been registered as one-touch destinations.
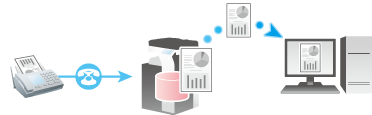
Q. Can I convert the received fax to a searchable PDF so that texts can be detected automatically on a computer?
A. To convert a fax received on this machine to a searchable PDF file, the optional unit is required. For details on the required option, refer to Here.
Q. Can I specify a file format for Internet Fax or IP Address Fax transmission?
A. No, format setting is not enabled.
You can set up [File Type] on the scan/fax screen of classic style even for Internet Fax and IP Address Fax transmission. However, the machine will convert the setting into the value preset on this machine instead of operating in the way you have specified.
Q. Can I check fax transmission and reception logs?
A. Yes. You can print out transmission and reception logs as a report.
Reports can be prepared for scan and send logs, fax communications (transmission and reception logs), fax transmission logs and fax reception logs.
Q. Can I check fax transmission and reception logs?
Operation method
Tap [Job List].
Specify a report type in [Report Type] on the [Comm. List] tab, and tap [Selection Confirm], then press the Start key.
Set [Output Limit] to specify the number of transmission and reception records to print.
Tap [Close].
Q. Can I output the transmission result (activity report) with 8-1/2 x 11 (A4)?
A. Yes. You can specify the paper tray to print a report in [Utility].
Specify the paper tray, which contains paper of the 8-1/2 11 (A4) size, to print a report.
Q. Can I output the transmission result (activity report) with 8-1/2 x 11 (A4)?
How to set
Tap [Utility] and select [Utility].
Select [System Settings] - [Print Lists].
In [Paper Tray], select the paper tray that contains 8-1/2 11 (A4) size paper, then tap [OK].
Q. How can I avoid printing out unwanted faxes?
Q. We are using multiple fax lines. Can I select a line when transmitting a fax?
A. Yes, you can select a line upon fax transmission.
For details on the operation procedure, refer to Here.
Q. We are using multiple fax lines. Can I select a line for transmission in PC-Fax TX?
A. Select [Utility] - [Administrator] - [Fax Settings] - [Multi Line Settings] - [PC-Fax TX Line Setting], then specify the line for PC-Fax TX.
Q. Can I fix the transmission header for each fax line?
A. You can specify the sender name and fax ID for each line in [Utility].
Follow the steps below to specify the sender name.
Set [Utility] - [Administrator] - [Fax Settings] - [TX/RX Settings], and set [Individual Sender Line Setup] to ON.
Select [Utility] - [Administrator] - [Fax Settings] - [Header Information], then specify the sender name for each line.
Follow the steps below to specify the fax ID.
Select [Utility] - [Administrator] - [Fax Settings] - [Header Information], then specify the fax ID for the first line.
Select [Utility] - [Administrator] - [Fax Settings] - [Multi Line Settings], then specify the fax ID for an additional line.
Q. How can I send a confidential or important document by fax?
A. Specify a Confidential User Box and a communication password in F-Code transmission to protect the confidentiality of the document.
For details on the operation procedure, refer to Here.
The F-Code transmission function can be used to communicate with a counterpart machine provided with the F-Code function.
To enable fax transmission to the Confidential User Box, a Confidential User Box and communications password must be set on the recipient machine.
Q. Can I send a fax upon request from the recipient?
A. Yes, you can, by using polling transmission.
In polling transmission, the sender's machine stores loaded data in its Polling TX User Box and sends out the data upon request from the recipient. The recipient making the request for fax transmission bears the communications fee.
For details on the operation procedure, refer to Here.
Q. Up to which number of broadcast transmission items is available for PC-Fax TX?
A. Up to 100 broadcast transmission items are available.
Q. I want to combine all originals into a single file when scanning a large number of original pages. Even if the number of pages exceeds the maximum number of sheets that can be loaded into the ADF, can I combine them into a single file?
A. Using the Separate Scan function, you can collect the original pages scanned in several batches as a single file. Also, you can insert an additional original into the current original and scan both of them as a single file.
For details on the operation procedure, refer to Here.
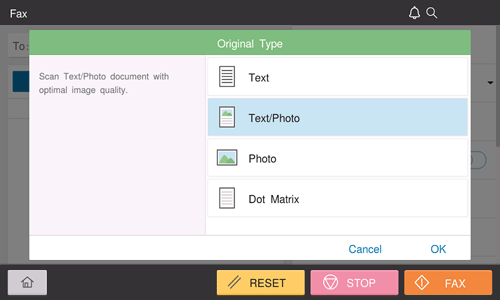
Q. Can I adjust the resolution for transmission?
A. You can either set the resolution (granularity) when sending a fax or specify the image quality according to the quality of the original.
Q. Can I adjust the resolution for transmission?
Operation procedure: Setting the resolution
Load the original.
Tap [Fax] on the home screen.
Specify the destination.
Select [Resolution], then select the desired resolution.
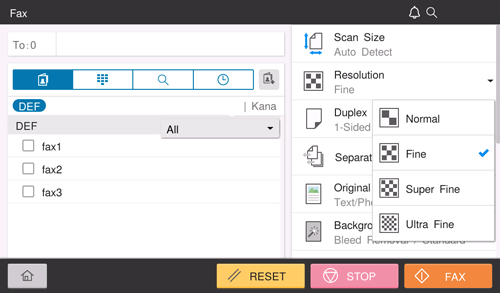
Use the Start key to start transmission.
Operation procedure: Specifying image quality according to the quality of the original
Load the original.
Tap [Fax] on the home screen.
Specify the destination.
Select [Original Type], then select the image quality that matches the contents of the original to be sent.
Use the Start key to start transmission.
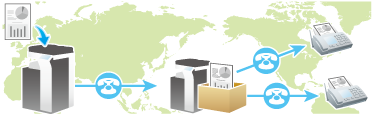
Q. How can I cut down on communications fees for sending out data?
A. You can use either relay distribution to forward data from a representative destination to the other destinations or timer communications billed at night-time rates.
The Relay Distribution function distributes a fax to the representative destination (a relay machine) and have the relay machine distribute the received fax to the pre-registered destinations.
Overall communication costs can be reduced by grouping relay stations and destinations by area, compared to the case in which faxes are broadcast to all destinations.
For example, when sending a fax to a number of remote destinations, you can minimize the total cost of communications by sending a fax to a closest relay machine and having it forward the fax to the others.
This machine can function either as a sender machine or a relay machine.
For details on the operation procedure, refer to Here.
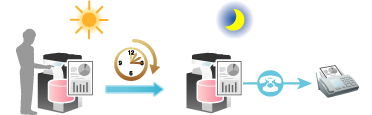
In timer communications (Timer TX), setting of destinations and loading of originals are performed during the day, followed by fax transmissions during a specified time zone late at night when communications fees are lower.
For details on the operation procedure, refer to Here.
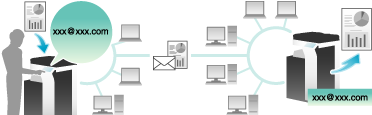
Q. Can I avoid expensive communication charges using the network?
A. Yes. Use the Internet Fax function to send an E-mail message with an attachment containing the scanned data merely at expenses for online communications via the Internet.
For details on how to use the Internet fax transmission, refer to Here.
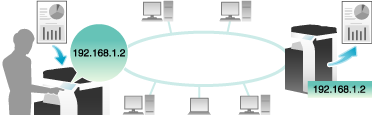
Within your intranet, the IP Address Fax function can be used. For IP Address Fax, specify either the IP address, host name or E-mail address of the destination fax machine to directly send a fax to that destination. No mail server is required.
For details on how to use the IP address fax transmission, refer to Here.
To use the Internet Fax and IP Address Fax functions, ask your service representative to configure settings. For details, contact your service representative.
To use the Internet Fax function, this machine must be connected to the network. In addition, you must have an environment enabled for E-mail transmissions and receptions. Prepare a dedicated Internet fax E-mail address for this machine.
The IP Address Fax function is only available between our models supporting the function or between devices matching the DirectSMTP standard. We do not give operational warranties for devices other than the models supporting the function.
Q. How can I configure a setting to always print the TX stamps?
A. In [Application] of scan/fax mode of classic style, set [TX Stamp] to [ON], select [Utility] - [Utility] - [Scan/Fax Settings] - [Basic Setting], then set [Default Scan/Fax Settings] to [Current Setting].
To use this function, an option is required. For details on the required option, refer to Here.
Q.When I load the original into the ADF after specifying a destination on the Scan/Fax screen, the destination is cleared. How can I configure a setting to prevent the destination from being cleared?
A. Set [Utility] - [Administrator] - [System Settings] - [Reset Settings] - [Job Reset], and set [When original is set on ADF] to OFF.